Sunday 7 June 2020

Programming AVR micro controller using Atmel Studio 7

In this blog, we will learn how to upload hex file using Atmel Studio. Atmel Studio is used for programming ATtiny, ATmega and AVR32 mirocontrollers. You can download atmel studio from:


Open Atmel Sudio from windows start menu:

File > New Project >  GCC C executable project

New Project


In device selection, choose Atmega8a

In main.c write down the following program for toggling PORTD

#define F_CPU 8000000
#include<avr/io.h>
#include<util/delay.h>

int main(void)
{
DDRD = 0xff;  // set portd as output
    while (1) 
    {
PORTD = ~PORTD; // toggle PORTD bits
_delay_ms(500); // delay of 500 ms
    }
}

Code Snippet

Follow the steps as mentioned above n the screenshot. 

Once the code is successfully compiled, we are ready for the next step i.e. uploading the program to the target board.

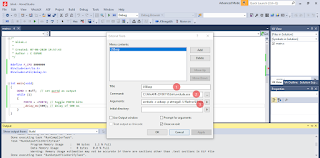
Go to: Tools > External Tools > 

External Tools


In arguments type this:
avrdude -c usbasp -p atmega8 -U flash:w:$(ProjectDir)Debug\$(TargetName).hex:i
since we are using atmega8.

Provide the path of avrdude in command. You can input USBasp in Title

Make connections as follows:

USBasp programmer                                                Atmega 8 target board

Vcc       ===========================>      Pin 7,20,21 
GND     ===========================>      Pin 8,22 
MOSI    ===========================>      Pin 11 
MISO    ===========================>      Pin 12 
SCK      ===========================>      Pin 13 
RST       ===========================>      Pin 1 

Now click on: Tools > USBasp

And voila your mcu is flashed!! 


Friday 5 April 2019

Morris Garage car event at JW Marriott, Delhi

MG Hector SUV is soon going to be launched in India market. It's truly internet of cars
MG Technology Partners:

The name 'Hector' draws inspiration from the noble qualities of the Trojan warrior hero – Prince Hector of Troy. It pays homage to great British engineering tradition, as a nod to the Royal Hector biplane, used by the Royal Air Force in the 1930s.


‘Hector’ stands for everything Strong, Bold, Trustworthy and Dependable.

Airtel, Microsoft, CISCO, Abode, AccuWeather, Nuance, Cognizant, Gaana, Panasonic, iSmart, Tomtom, SAP, Unlimit


MG Hector JW Marriott


Monday 7 May 2018

Arduino python GUI led control

Hello Friends,

In this project, we are interfacing arduino with python. Arduino can be easily interfaced with python using serial communication (uart) via pyserial library. For GUI on python, we are using tkinter.

Let's start with the python script:
Libraries required: pyserial

It can  be esaily installed by: pip install pyserial


Monday 30 April 2018

How to load hex file into AT89S52

In this post, we will learn how to upload hex file into AT89S52. It's a bit difficult to upload hex file into AT89S52 unlike atmega controllers which use AVRdudes for uploading hex file.

AT89S52 ia 40-pin IC and it has 40 GPIO pins and there are 4 ports viz, PORT 0, 1, 2 and 3. Each port has 8 pins. Total GPIO pins are: 8(pins in each port) * 4 (total number of ports) = 32 gpio pins
PORT0 is pull-up rest of the ports have internal pull-up resistor.

In order to eliminate tri-state condition in 8051 we can use network resistor of 10k (A103J)
It have peripherals like: Timer/ Counters, UART, GPIO programming, interrupt programming, etc. It don't have built-in ADC, SPI, I2C and there is no option of  internal RC oscillator.

It's Machine Cycle (MC) is calculated by: 12/ 11.0592 MHz = 1.085 us

Hardware required:
  • USBasp Programmer
  • AT89S52 development board (either on strip board or bread board)
Software required:
  • Progisp (for dumping hex file)
  • Keil uVision (8051 IDE for programming)

Thursday 1 March 2018

Connecting Raspberry Pi to visible/ hidden SSID

Hello Folks,

In this tutorial, we will learn how to connect Raspberry Pi using command line.
First of all, open terminal
and type the command:

sudo nano /etc/wpa_supplicant/wpa_supplicant.conf

This will open nano text editor with wpa_supplicant.conf file. Now, we have to add some statement for connecting it to WiFi

At the end of the file, add these statements:

Wednesday 7 February 2018

Arduino and processing based GUI person counter

In this post, we will make arduino and processing based GUI person counter. For person counter, we are using infrared sensor (IR). It's output is digital and is fed to pin number 7 of arduino.

The connections are as follows:
Connection of arduino with proximity sensor


Interfacing HC-05 with Atmega8

In this post, we will interface bluetooth module (HC-05) with atmega8. Atmega8 is a 28-pin IC and it has three ports viz., PORTB, PORTC and PORTD and it has total 23 gpio pins. It has internal rc oscillator, that is user selectable from  1, 2, 4 or 8 MHz.

We are using 8 Mhz internal rc oscillator.

Compiler Used: GCC

Connection is as follows:

Atmega8                                     BT module
RX            ============>     TX
TX            ============>     RX
GND         ============>     GND
VCC         ============>     VCC

We are using uart at baud rate 9600. Make sure that BT module and atmega8 both have same baud rate.

Saturday 12 August 2017

Getting Started with NodeMCU

Hello Friends,

Today we will write first program for NodeMCU3 that is led blinking. NodeMCU3 has esp12e and ch340 (USB-TTL) on-board. It can be connected to PC/ Laptop via USB mini(type B) data cable.

Let's get started.

All we need is NodeMCU3 and arduino IDE.
LED and resistor