Open Atmel Sudio from windows start menu:
File > New Project > GCC C executable project
In device selection, choose Atmega8a
#define F_CPU 8000000
#include<avr/io.h>
#include<util/delay.h>

int main(void)
{
	DDRD = 0xff;  // set portd as output
    while (1)
    {
		PORTD = ~PORTD; // toggle PORTD bits
		_delay_ms(500); // delay of 500 ms
    }
}
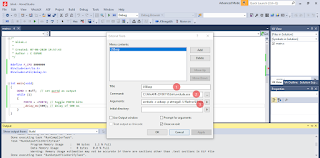
Follow the steps as mentioned above n the screenshot.
Once the code is successfully compiled, we are ready for the next step i.e. uploading the program to the target board.
Go to: Tools > External Tools >
In arguments type this:
avrdude -c usbasp -p atmega8 -U flash:w:$(ProjectDir)Debug\$(TargetName).hex:i
since we are using atmega8.
Provide the path of avrdude in command. You can input USBasp in Title
Make connections as follows:
USBasp programmer Atmega 8 target board
Vcc ===========================> Pin 7,20,21
GND ===========================> Pin 8,22
MOSI ===========================> Pin 11
MISO ===========================> Pin 12
SCK ===========================> Pin 13
RST ===========================> Pin 1
Now click on: Tools > USBasp
And voila your mcu is flashed!!


