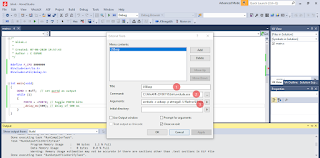
Open Atmel Sudio from windows start menu:
File > New Project > GCC C executable project
In device selection, choose Atmega8a
#define F_CPU 8000000
#include<avr/io.h>
#include<util/delay.h>

int main(void)
{
	DDRD = 0xff;  // set portd as output
    while (1)
    {
		PORTD = ~PORTD; // toggle PORTD bits
		_delay_ms(500); // delay of 500 ms
    }
}
Follow the steps as mentioned above n the screenshot.
Once the code is successfully compiled, we are ready for the next step i.e. uploading the program to the target board.
Go to: Tools > External Tools >
In arguments type this:
avrdude -c usbasp -p atmega8 -U flash:w:$(ProjectDir)Debug\$(TargetName).hex:i
since we are using atmega8.
Provide the path of avrdude in command. You can input USBasp in Title
Make connections as follows:
USBasp programmer Atmega 8 target board
Vcc ===========================> Pin 7,20,21
GND ===========================> Pin 8,22
MOSI ===========================> Pin 11
MISO ===========================> Pin 12
SCK ===========================> Pin 13
RST ===========================> Pin 1
Now click on: Tools > USBasp
And voila your mcu is flashed!!


Nice post! Thank you for posting it. CouponkozIndia
ReplyDeleteAmazing & informative blog on technology
ReplyDeleteThanks for sharing information.
Keep Blogging
Visit our website for smart lights, motion sensors, home automation devices and Motion sensor light switch.
I really appreciate your blog, it is really helpful for all. Keep blogging to attract reader's attention
ReplyDeleteVisit our website for best student visa consultation service, We are top Australia Student Visa Consultants in Vadodara
Great share! Amazing write-up!
ReplyDeleteI like Your articles and your information is so clear. I liked it. I appreciate your work
Visit our website for Best Offers on Apple Products, We are authorised Apple Store in Vadodara
Very useful information.
ReplyDeleteAre you looking for the Best Gas Chromatography Manufacturers in India.
Great read! Setting healthy boundaries is crucial. If you need support, explore our guide to the most effective Fortnite child addiction solutions for lasting change.
ReplyDeleteGreat post! This is such an important topic, especially for parents. If you're concerned about screen time, check out our full guide on Fortnite addiction in kids and how to manage it effectively.
ReplyDeleteI love how the Android Auto Head Unit makes driving more enjoyable by providing seamless access to apps and controls that matter most on the road. Android Auto Head Unit
ReplyDelete