Saturday, 31 December 2016

How to update esp8266 firmware

In this post, we are going to upload firmware to ESP8266 (ESP-01) . The firmware can be updated by both arduino as well as usb-ttl module.
ESP-01 is wifi SoC module and it has two GPIO pins i.e. GPIO0 AND GPIO2
For using ESP8266, we can use either AT commands using any terminal software/ esplorer ide (it supports lua programmming and AT commands) or we can use arduino library.
ESP8266 is a 8-pin SoC having two GPIO pins, it requires 3.3 volt and the current consumed by wifi module can't be attained through arduino. Therefore, if we are using arduino we need external 3.3 volt power supply.
Esp8266 wifi module can act as STA as well as AP or both

Monday, 26 December 2016

How to make a simple IR remote tester using TSOP 1838

In this post, we will make a simple IR remote tester. Since infra red rays are invisible to light we can't check it using naked eyes. Therefore, we need some device/ instrument for testing it.

One simple method to check IR remote is by using mobile or digital camera. However, it's not handy.
We will make a simple circuit using TSOP1838

We simply need a Tsop1838, one led (RED 5mm) and a 220 ohm resistor.

Wednesday, 14 December 2016

Arduino knight rider circuit using led bargraph

In this post, we are going to make knight rider circuit using led bargraph. Led graph, it consists of 10 leds.

Stuff required:

  1. Arduino uno
  2. LED bargraph
  3. 220 ohm resistor
  4. connecting wires
Connections:

First of all, make connections as given in the diagram below:

Friday, 9 December 2016

Serial communication with arduino

In this post, we will learn how to serial communicate other device or arduino suing serial communication.

Introduction:

Serial communication (RS-232) is widely used communication for data transfer. It just uses three wires: Rx, Tx and GND

  In serial communication, 8/9 -bit is transferred through a single wire. The data frame is like this:

Start bit > Data fields (8 or 9 bit data) > Stop bit

Friday, 2 December 2016

Arduino based DC Voltmeter (0-50 volts)

In this post, we are going to make digital voltmeter using arduino uno. It's a DC voltmeter and it's range is 0 to 50 volt. As we know, arduino is an open source hardware prototyping platform used worldwide by the hobbyists, educators and students across the globe.
This is a handy voltmeter.

Stuff required:

  1. Arduino uno
  2. 16*2 lcd
  3. 10k pot
  4. voltage source

Friday, 25 November 2016

3*3*3 LED cube using arduino uno

Hello Friends,

In this post, we are going to make 3d led cube using arduino. It's 3*3*3 led cube, so require a total of 27 leds. For driving 27 leds we require driver IC like ULN2003.


List of components:
  • Arduino uno
  • 27 LEDs
  • ULN2003
  • Perfboard
  • 8 220 ohms resistor
  • Jumper wires

Tuesday, 15 November 2016

Line follower robot using Atmega8


In this post, we are going to make a line follower robot using atmega8. Line follower robot is based on tracking a line of particular colour. This is done by infrared (IR) sensor. IR sensor gives us a digital output.

Things required:

  1. Atmega8a 
  2. L293d (H-bridge ic)
  3. DC geared motor
  4. chasis
  5. 2 Ir sensor
  6. Power supply (9 volt battery)

Sunday, 13 November 2016

Sending SMS using Atmega16

Hello Friends, in this post we are going to send text sms using atmega16a and Gsm module.
First of all, GSM module is communicated using atmega16a using serial communication.

Stuffs required:

  1. Atmega16a 
  2. GSM module
  3. 12V, 2A dc adapter
  4. Sim card having sms pack
  5. Some jumper wires
Connection:

Make connection like this. 

Atmega16a                              GSM module
Tx              ========>          Rx
Rx              ========>          Tx
Gnd            ========>          Gnd

Sunday, 23 October 2016

Using internal pull-up resistor in arduino

In this post, we will discuss how to use internal pull-up resistor in arduino uno. It's quite simple.
No need of using external pull-up resistor.

What is pull-up resistor?

First, we will find what pull-up resistor is and why it is used.

In many microcontroller, there are no internal pull-up resistor. For example: In 8051, there are four IO ports. Port0 has no internal pull-up resistor. Therefore, it requires external pull-up resistor.

In arduino, the moment we define any pin as input it will attain tri-state. Tri-state is  a state between logic low and logic high. We must remove this condition. Some microcontrollers have built-in internal pull up resistor while some has not.

Tuesday, 18 October 2016

Interfacing accelerometer with arduino uno

Interfacing accelerometer with arduino uno


Introduction:

In this post, we are going to interface accelerometer with arduino. Accelerometer is a sensor used for detecting motion or change in coordinates. We have three coordinates i.e X, Y and Z axis. It's a five-pin device out of which are for power supply Vcc and Ground. The output of the sensor is in analog.
This sensor required three analog pins. We can provide Vcc and ground directly from the analog pins.
So, we are using five analog pins. Three for axis and two for providing power to the module.

Components required:

  1. Arduino Uno
  2. ADXL335 (accelerometer)
  3. USB type B cable for interfacing with computer.
Connections:

Make connections as follows:

ADXL335                                    Arduino
Vcc                                               A0
X                                                  A1
Y                                                  A2
Z                                                  A3
Gnd                                              A4

Friday, 14 October 2016

Smart street light using arduino

Introduction:


This project is about smart street light using arduino. This project consists of 3 analog IR (infrared) sensors. By default, the intensity of street light is set to 50 percent. We are using high intensity led as they have extra brightness. This project also features harnessing the solar and wind energy.
We are using a solar panel of  9 Volt, 2.5 watts and for wind mill, we are simply using a 12 volt dc motor.

Components required:
  1. Atmega 8a (based on arduino ng board)
  2. 8 high-intensity led
  3. Relay
  4. Perfboard
  5. 7805
  6. connecting wires
  7. solar panel (9 volt, 2.5 watt)
  8. Relay
  9. 12 volt DC motor.

Saturday, 8 October 2016

Temperature on GUI using visual studio and arduino

In this post, first we will interface LM35 with arduino uno and then  upload this data through serial communication. With the help of visual studio we can make computer gui application and though this gui application, we can do lot of stuffs like temperature logger, humidity monitoring. The

Stuff we require:

  1. Arduino uno with usb cable
  2. LM35
  3. Jumper wires
  4. Visual Studio (I had used VS 2012)
Make connections as follows:

How to interface temperature sensor, lm35 with arduino
LM35 interfacing with arduino


Simply provide, Vcc and GND to temperature sensor (LM35) and it's output should be connected to A0 of arduino. You can connect it to any channel from A0 to A5.

Friday, 30 September 2016

Temperature updation on thingspeak using sim900


In this post we are going to discuss how to upload temperature on thingspeak channel using sim 900 and arduino uno. As I had already uploaded the data on thingspeak channel using sim 900 and terminal software.

Introduction:

This project is a wireless temperature logger on thingspeak channel using gsm module and arduino.
For temperature sensor, we are using lm35, that gives output in millivolt which can be easily calibrated in  terms of  °C. We have to use adc module, since it's an analog sensor. Once the raw data is converted into temperature, we can upload the data.

Now, we are ready to upload the data on thingspeak channel. Thingspeak provides api for uploading of data. Before this, we have to use activate GPRS on sim900. We also to provide APN for accessing the internet. After activating the GPRS, we have to use GET like this:

GET http://api.thingspeak.com/update?api_key=KTQXXXXXXXXXXXXX&field1=data

Saturday, 24 September 2016

Internet of things: Data uploading on thingspeak using sim900

In this post, we are going to upload data on thingspeak using sim900 module.

Things required:

  1. SIM 900 module
  2. USB-TTL converter
  3. Terminal software
  4. Account on thingspeak
  5. 12 volt adapter for powering gsm module
First of all, make connections as follows:

GSM                                           USB-TTL

RX        ==============>    TX
TX        ==============>    RX
GND     ==============>   GND

Tuesday, 30 August 2016

How to enter AT mode in HC-05 bluetooth module

Using HC-05 in AT mode

Hello guys, In this post we will cover how to change password, name or mode (master or slave) in HC-05 module. 

Things required:

1. Arduino Uno board
2. Jumper wires
3. HC-05
4. Little bit patience :p

Note: Use can USB-TTL instead of arduino uno board. In this case, arduino uno board is simply used as USB-TTL converter.

Steps to follow:

First of all, upload a blank program to arduino.

/* Arduino Program */

void  setup(){

}


void  loop(){

}

Saturday, 27 August 2016

Password protected system with AVR using DTMF

Password protected system using DTMF

Hello guys, this project is about password protected system using DTMF module. By using a predefined number we can make output either high or low by using the three digit code.
The codes can be changed in the program.

Components required:

  • Atmega 16A
  • USBasp programmer
  • AVRdudes (for burning hex file)
  • AVRStudio 4
  • Compiler used: GCC
  • DTMF module
  • 3.5 mm audio jack

FOR OUTPUT LOW CODE IS str1="248"
FOR OUTPUT HIGH CODE IS str2="842"

Connections are as follows:

Q0-PD0
Q1-PD1
Q2-PD2
Q3-PD3

Output is from: PB0.

Saturday, 25 June 2016

Interfacing GPS module with computer using terminal software

In this post, we will learn how to interface GPS module with laptop/ computer using terminal software like Bray's terminal.

Stuff required:


  1. GPS module
  2. 12V 2A dc adapter
  3. USB-TTL converter
  4. Female to female jumper wire
First of all, power up the GPS module using 12 volt adapter. 
Download any terminal program. I am using bray's terminal.

Friday, 24 June 2016

List of projects

List of projects:

1. Line follower robot
2. Android controlled home automation system
3. Fire fighting robot
4. Hand gesture based robot
5. GSM based temperature monitoring system
6. Android controlled robot
7. Smart blind stick with audio processor module
8. Smart street light


DIY dtmf module and interfacing with arduino uno


In this post, we are going to make dtmf module and interface it using arduino.

DIY dtmf module with arduino uno
My prototype

Theory of  DTMF:
Full form of dtmmf is dual tone multi frequency. The DTMF telephone keypad is laid out in a 4×4 matrix of push buttons in which each row represents the low frequency component and each column represents the high frequency component of the DTMF signal. Pressing a key sends a combination of the row and column frequencies. For example, the key 1 produces a superimposition of tones of 697 and 1209 hertz (Hz). Initial pushbutton designs employed levers, so that each button activated two contacts. The tones are decoded by the switching center to determine the keys pressed by the user.

Tuesday, 21 June 2016

Simulate program in proteus

In this post, we will cover how to simulate program files in proteus.

Proteus is a simuation software used for simulating analog/ digital circuits as well as for simulating embedded based projects. It can used for simulating 555 based, transistor based circuits. It's a very good tool for hobbyists, students and professionalists. This is not a freeware however one can download the trial version from the official website or simply purchase it.

Step 1: First of all, choose the components from the library by simply right clicking on grid area.

Search component in proteus library
Components from libraries
Step 2: In keywords box, type atmega 16 and  select appropriate components from the listed item.

How to make a new project in AVR Studio 4

Steps for making a new project in AVR Studio 4:


Step 1: From file menu click on project. Under project select project wizard
project wizard in avr studio 4
Project Wizard

                   Step 2: Click on new project then click next


new project in avr studio
New project

Wednesday, 1 June 2016

Interfacing 4-wire resistive touch screen with arduino

To interface the 4-wire resistive touch screen with arduino check out my instructables. Here is the link


Check out the video:


Sunday, 22 May 2016

DIY audio amplifier using lm386

In this post, we will make a diy audio amplifier using lm386.

LM386 is low voltage audio amplifier and it's gain is in the range of 20 to 200

Parts required:


  1. LM386
  2. Breadboard/ perfboard/ stripboard
  3. 10k pot
  4. 8 Ω speaker
  5. 9 volt battery
  6. 220 uF capacitor
  7. connecting wires
Circuit diagram:

fritzing circuit diagram audio amplifier
Circuit Diagram
In this circuit, pot of 10k is used for controlling the volume. Gain in this circuit is 20. You can also also power supply of 5 volt. This is the basic circuit having gain equals to 20 and there is no bass in this circuit. You can give audio input from mobile/laptop.

Hope you had enjoyed the tutorial.

Stay tuned for more updates !!


Monday, 16 May 2016

How to burn hex files in avr microcontrollers

In this post we will learn, how to burn hex file in avr microcontroller using programmer and burner software.

List of components/software:

1. USBasp programmer
2. Target circuit board having microcontroller (mine have atmega8)
3. Avrdudes (Burner software)

Prerequisites:
USBasp driver installed in your system.
If it is not installed, then read instructions about installation from my previous post.
USBasp driver installation

Default fuse byte for atmega8a is: HFUSE = 0XC9 and LFUSE = 0X1F
This corresponds to internal rc oscillator having frequency 1 MHz

HFUSE = 0XC6 and LFUSE = 0XE4
This corresponds to internal rc oscillator having frequency 8 MHz

Tuesday, 10 May 2016

Temperature controlled dc fan

In this post, we will control the speed of dc fan based on the temperature.

List of components:

1. Arduino Uno
2. LM 35 temperature sensor
3. LCD 16*2
4. 10k potentiometer
5. ULN 2003
6. DC motor
7. Breadboard/ perfboard

First of all, we will monitor the temperature by using lm35 i.e. temperature sensor. It's scale factor is +10mV/°C which means with increment in temperature by 1° Celsius, the voltage is rise by 10 mV.
We can read adc count by analogRead(A0); // we are using channel A0

This will give us a digital count of adc which varies from 0 to 1023, we have to convert these count into voltage and then into temperature. First of all, we will convert into voltage:
In arduino uno, adc is of 10-bit.
Resolution = Vref/(2^n-1), where n is bit (in our case it's 10)
Resolution = 5000 / 1023, ( Verf = 5000 mV and 2^10 is 1024 minus 1 is 1023)

Resolution = 4.887 mV
Now, we have to convert voltage into temperature:
Temperature (in °C) = Voltage (in mV) / 10.0
With this temperature monitoring is over.

LCD interfacing is simple since we have library for the same with proper documentation.

Now coming to pwm part. In arduino, we can control output voltage by pulse width modulation (pwm).
Duty Cycle = Ton / (Ton + Toff)
Duty Cycle = Ton / T

Duty Cycle (in %age) = (Ton / T)*100

In arduino, for pwm we have analogWrite function :

In arduino uno, we have six pwm channels viz, pin no. 3, 5, 6, 9, 10 and 11.

analogWrite(pin no, value)

Pin no may be 3, 5, 6, 9, 10 and 11
Value varies from 0 to 255 since pwm resolution is of 8-bit (2^8-1)

0 for 0% duty cycle                  0 volts
64 for 25% duty cycle              1.25 volts            if(val<=40.0)
127 for 50% duty cycle            2.50 volts            if(val>40.0 && val<=50.0)
192 for 75% duty cycle            3.75 volts            if(val>50.0 && val<=60.0)
255 for 100% duty cycle          5.00 volts            if(val>60.0)

where val is temperature in °C

Vavg = Duty Cycle  * 5.0 volts
temperature controlled dc fan proteus simulation
Schematic of temperature controlled fan
Download the source code from the link below:


Stay tuned for more updates !!


Thursday, 5 May 2016

Driver for usbasp programmer

How to install usbasp driver in your pc/laptop?

https://drive.google.com/file/d/0B4Px6Drl6Zz_aGlDZnY0YmV6SUk/view?usp=sharing

Download driver from the above link. Extract the file, now you have two folders:

 windows-8-and-windows-10-usbasp-drivers-libusb_1.2.4.0-x86-and-x64-bit and  Win-Driver.
Former is for windows 8 and windows 10 while latter is for windows 7.

Open device manager after connecting the programmer you can see the yellow triangular icon which indicates that no driver is installed.

Device Manager
Right click on usbasp, you have two options of installing the driver, click on browse my computer for installation of driver.
Broswe
Browse the following directory in your computer:

E:\PROJECTS\8051_kit_programmer\AVRUPro+\Win-Driver. 
After extraction, you have two files. Let's suppose you have usbasp_driver folder in E drive.
Browse E:\usbasp_driver\Win-Driver if you are using Windows 7.

After selecting it will ask for driver installation, click on install this driver anyway.
Installing the driver
If the driver is installed successfully, you can check its status in device manager.
Post-installation
This post was for installing usbasp driver in windows 7. If you are using windows 8 or 10.

If you want to install usbasp driver in windows 8/10. You can do it by disabling driver signature option. You can google it for the detailed procedure.

Stay tuned for more updates !!


Tuesday, 3 May 2016

Interfacing SIM900 with arduino uno

In this post, we will learn how to interface SIM900 with arduino uno.

First of all, insert sim in sim socket of GSM module. Power it up by 12V 2A dc adapter.

Now, we have to make connections as follows:

Arduino Side                       GSM module
Tx                =====>          Rx
Rx                =====>          Tx
GND            =====>          GND

The source code is given below:

    boolean bOK = HIGH;

    void setup()
    {
    Serial.begin(4800);
    delay(1200);
    }
    void loop()
    {
 
    if(bOK==1)
    {
    Serial.println("AT+CMGF=1"); // sets the SMS mode to text
    delay(1500);
    Serial.print("AT+CMGS=\""); // send the SMS number
    Serial.print("+9199XXXXXXXX"); // +91 for india
    Serial.println("\"");
    delay(1000);
    Serial.print("Hello World "); // SMS body
    delay(500);

    Serial.write(0x1A);
    Serial.write(0x0D);
    Serial.write(0x0A);
    bOK=LOW;
    }
    }

The source code is self-explanatory.

Thanks for visiting this blog.

Stay tuned for more projects !!

Friday, 29 April 2016

Interfacing temperature sensor with arduino

Interfacing temperature sensor (LM35) with arduino:

In this post, we will learn how to interface temperature sensor (LM35) with arduino uno.

Arduino Uno is an open-source electronic prototype board used by beginners, hobbyists and developers across the globe, Arduino have so many forums, if you need any help, guidance.
Arduino uno is based on atmega 328p microcontroller. Arduino uno comes in two pckages:
Through-hole package and SMD package.

For the time being, we are considering through-hole package. It's a 28-pin DIP (dual inline package) IC.  There are 14-digital I/O pins and 6-analog input pins.
Arduino has a rich library support. For example: led blinking, lcd interfacing, etc. all these program can br found in library.

In order to display data received from temperature esnsor, we need display device like seven segment display or lcd or alternatively we can use serial monitor.

LM-35 is a temperature sensor. It's sensitivity is 10mV/°C which literally means with rise in temperature by 1° Celsius the voltage is increased by 1 millivolts. It's graph is linear.
It's range is from -55° Celsius to +150° Celsius.

Arduino have 6-adc channels viz, A0-A5. These are 10-bit adc means 0-5 analog volt is converted into digital count ranging from 0-1023

Resolution = Vref/((2^10)-1) = Vref/1023

We are taking Vref as 5 volt. Now, the resolution comes out to be 4.887 mV

In order to convert digital count into voltage, we have to multiply it by 4.887. Now we have voltage. We have to convert this voltage into temperature. This is known as calibration.

Temperature in ° C = 4.887 * digital count (0-1023) /10.0

Here are the screenshots of prteus simulation and code:

Interfacing temperature sensor with arduino proteus simulation
Proteus simulation


Download arduino code and simulation from the link given below:

https://drive.google.com/file/d/0B4Px6Drl6Zz_RFB2MEM4YUdPRGM/view?usp=sharing

Stay tuned for more updates !!


Wednesday, 27 April 2016

Using atmega 8 in Arduino IDE

This post is important since atmega 328p is way more expensive than atmega 8a. We can use arduino IDE with atmega 8 too.

Open arduino IDE and from file menu select Examples>Basics>Blink.
In next instance, code for blinking a led will be displayed on your screen.

Now from Tools>Board>Arduino NG or older

Arduino ng or older
Selecting arduino ng or older

Now, we have to choose microcontroller:
Tools>Processor>Atmega 8

Selecting atmega8 from processor
Selecting atmega 8
Now, we have to just compile the program.
Just click on the first icon just below the file menu.
compile the code
Compiling the code
Also, make some changes in preferences: File>Preferences
Arduino preferences
Preferences
Make changes as given above. This make the IDE more user-friendly.
Note: Preferences has nothing to do with programming part. It just makes IDE more user-friendly.

Now, our hex file is generated. One question arises: How to locate the hex file?

First of all, click on view to display hidden files and folders:
hidden files and folders
View hidden files and folders
After this, hidden files and folders will appear:
You can retrieve hex file from the following directory:

C:\Users\user_name\AppData\Local\Temp\build9c9ef3bdfe2fccb480bc6e4bac749e41.tmp

In this folder, resides your hex file. Check the date and time of hex file.

I am using avrdudes for burning the hex file in atmega 8a.

Fuse byes are as follows: Low fuse: 0xE4
                                         High fuse: 0xC6
This setting is for 8-MHz internal oscilltor.

Note: Wrong fuse bytes can damage your microcontroller.
The delay of arduino IDE is not in sync with your coding due to indifference in crystal oscillator.

Thanks for your patience.

Keep supporting !!


Wednesday, 6 April 2016

Simulating arduino uno in proteus

By default, proteus don't have any library for arduino.

First of all, install library for proteus using the previous post Arduino library

Now, one problem arises how to get hex file of our program.

It lies in the following directory:
C:\Users\ \AppData\Local\Temp

You can make a shortcut of temp folder on your desktop to easily access it. By default, temp folder is hidden you have to unhide it.

This picture will make it simple

file directory for arduino hex file
File directory
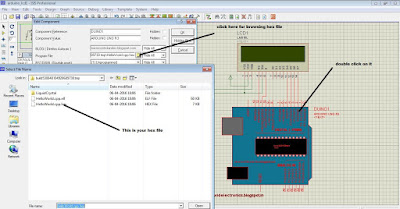
In proteus, double click on arduino uno. It will pop-up a window named edit component on program file click on browse icon to browse your hex file.
Browsing hex  file for proteus simulation
Browsing hex file
Always double the time and date of your hex file to ensure that are using correct file.

Thanks for giving your valuable time.

Stay tuned for more updates !!


Interfacing lcd with arduino

How to interaface lcd (4-bit interface) with arduino?

In this tutorial, we are going to discuss , how to interface lcd with arduino.

We are using 16*2 lcd, means it have two rows and 16 columns. Overall, we can display 32 characters.
16*2 alphanumeric lcd
16*2 LCD

Lcd have 16 pins, out of which six are connected to arduino. D4-D7 are data pins. RS, RW and EN pins are also there. RW pin is permanently grounded since we are writing to lcd.
Pin no 3 is connected to pot (10k) in order to change the contrast. Pin no 15 and 16 are for backlight.
Since lcd don't have any backlight.

Code:

// include the library code:
#include <LiquidCrystal.h>

// initialize the library with the numbers of the interface pins
LiquidCrystal lcd(12, 11, 5, 4, 3, 2);

void setup() {
  // set up the LCD's number of columns and rows:
  lcd.begin(16, 2);
  // Print a message to the LCD.
  lcd.print("hello, world!");
}

void loop() {
  // set the cursor to column 0, line 1
  // (note: line 1 is the second row, since counting begins with 0):
  lcd.setCursor(0, 1);
  // print the number of seconds since reset:
  lcd.print(millis() / 1000);
}

Proteus simulation of arduino uno
Simulation in proteus
Hope, you had enjoyed the tutorial.

Stay tuned for more updates !!

How to add library to proteus

In this post, we are going to discuss how to place library in proteus. As we all know that, there is no library of many components/ devices in arduino. We can add external libraries to proteus either provided by third party or written by an individual.

Basically, library consists of two files having extension .IDX and .LIB

We have to place these two files in the following directory:

C:\Program Files (x86)\Labcenter Electronics\Proteus 7 Professional\LIBRARY

If you are using 32-bit windows, then you to place  file in Program Files. As there is no Program Files(x86) in 32-bit windows.

Download arduino library from the link given below:

Download from here:

Now extract this rar file. You have to place only arduino.idx and arduino.lib in library folder.

how to add library in proteus

Proteus
Check this video:


Hope, you had enjoyed the tutorial.

Stay tuned for more updates..

Saturday, 12 March 2016

IR remote based home automation using arduino

IR remote based home automation using arduino:

With new advancement in technology, we are going towards automation. In this post we will learn how to control your home appliances using IR remote. Since bluetooth and wifi are expensive as compared to IR remote.

List of components:

1. Arduino Uno
2. TSOP 1738/1838
3.  6 V/7 A relay * 2
4. ULN 2003

Block diagram of IR remote based home automation
You can download the code from the following link:
https://drive.google.com/file/d/0B4Px6Drl6Zz_Um9ZbC1Ra09ONkU/view?usp=sharing

The code is self-explanatory.

Check out the video:


Stay tuned for more projects !!